


Acorn 6210 water/condensation problem update 07.07.2012
I'm very happy and relieved to be able to say that the reason for the condensation problem in the Ltl Acorn 6210 Trail Camera has been identified.
After lengthy tests and analysis the cause of water getting into the control panel is, at long last, understood; and some final changes to the case upgrade are now being made.
I don't know exactly how long this will take, but it will be as fast as possible.
I will post a full explanation of the problem and how it was solved at a later date. Users of cameras which have this problem should remove the rubber bung (external power supply input) from the base of the camera.
...................................................................................................................................................................
Once more I'm writing about the problem of water getting into the Little Acorn 6210 trail cameras, to show you a workable fix which I'm using to avoid having to return them. I don't want to lose the use of mine while I wait for replacements; and as they are otherwise a perfectly good camera, the following is my solution.
If you require Silica Gel sachets (Figures 12 and 13) I can supply three sachets for each camera purchased from me FOC. For cameras purchased elsewhere the cost for each sachet is 0.15GBP plus shipping. Please send a request by email and I will tell you how to pay.
These 3 gram self indicating Silica Gel sachets are the optimum for this purpose. Larger ones will not fit and smaller ones will not give so much in field life. If you have any questions please ask.
 |
| Fig 1. Cut a strip of thin polythene 220mm x 15mm. Then from a roll of camouflage tape cut three strips as follows: Strip 1: 235mm x 25mm. Strip 2: 190mm x 25mm. Strip 3: 130mm x 25mm. Cut a 7mm square out of two corners of strip 1 as shown above. |
 |
| Fig 2. Turn the the long strip of tape on its back and press the strip of polythene onto the adhesive surface. |
 |
| Fig 3. Lay the bottom of the camera over the strip. |
 |
| Fig 4. Wrap the tape/polythene strip around the base of the camera, keeping the bottom edge of the strip level with the bottom edge of the control panel door. |
 |
| Fig 5. Press the tape firmly down all round but don't worry about where it covers the lower row of grip studs. |
 |
| Fig 6. Add the second longest piece of tape to the back with it half overlapping the first tape. |
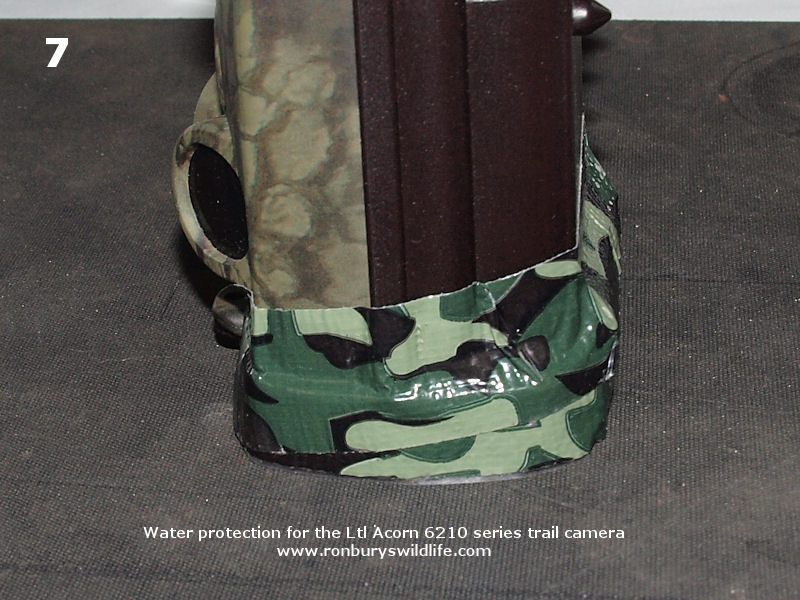 |
| Fig 7. When you fold the ends around the sides of the camera, let the ends fall naturally downwards to avoid unnecessary creases. Press the tap firmly down all round, burnishing into all the groves and corners, making sure there is nothing sticking out that will collect water. |
 |
| Fig 8. Add the third, shortest piece of tape, to the back of the camera with it half overlapping the second piece of tape. The ends will reach to the side seam of the camera. |
 |
| Fig 9. Firmly press all the tape into the surface and again burnish into all the case grooves. |
 |
| Fig 10. The polythene liner prevents the tape sticking to the edges of the door so that it can be opened and closed. |
 |
| Fig 11. When the door is closed, its side ends may start to crease the skirt; which can be teased out with a finger nail or a knife blade. |
 |
| Fig 12. I have sourced 3 gram, self indicating, Silica Gel sachets which can be used to capture any moisture which still enters the camera. They need the two longest edges cut down so that they fit inside the control panel door. It's important to make sure that the edges of the sachet don't get trapped in the door seal, which would suck moisture inside like a wick. |
 |
| Fig 13. When placing the sachet in the door, flatten out the contents and position the body of the bag over the screen. There isn't much room between the screen and the camera body; and a lumpy sachet may stress the door when closed. |
 |
| Fig 14. Finished job from the back. |
 |
| Fig 15. Finished job from the front. Please note that this is not a manufacturers approved solution, just my way of dealing with the problem. It's not difficult to do, so if you follow the above carefully you shouldn't have any difficulties or do any damage to the camera. I cannot however, accept any responsibility for issues arising from your attempting this modification or using Silica Gel sachets. |
